
A subwoofer enclosure should match the speaker, amplifier and available vehicle space. The first decision is whether you need an empty box, a box with a subwoofer already installed, or a powered enclosure with its own amplifier. Listings often place all three together, but their installation requirements and total costs differ substantially.
The three examples below cover those routes. Choose the category that fits the equipment you already own, then check physical fit and electrical requirements. A large advertised wattage or “universal fit” label cannot answer those questions.
Choose the right type of enclosure
- Empty enclosure: You supply the subwoofer and amplifier. Useful when you already have a driver, but its recommended box volume, tuning and mounting dimensions must match.
- Passive loaded enclosure: The manufacturer supplies the box and installed subwoofer. You still need a suitable external amplifier and wiring.
- Powered enclosure: The subwoofer, box and amplifier are supplied together. You must still provide a compatible audio signal, properly installed power and ground wiring, and secure mounting.
For a truck’s under-seat space or an unusual cargo area, a vehicle-specific or custom enclosure may be more practical than any general-purpose box. Confirm cab style, seat layout and required clearance before treating a vehicle-year listing as proof of fit.
Three subwoofer enclosures for different starting points
Skar Audio SK1X12V: an empty single-12-inch ported box
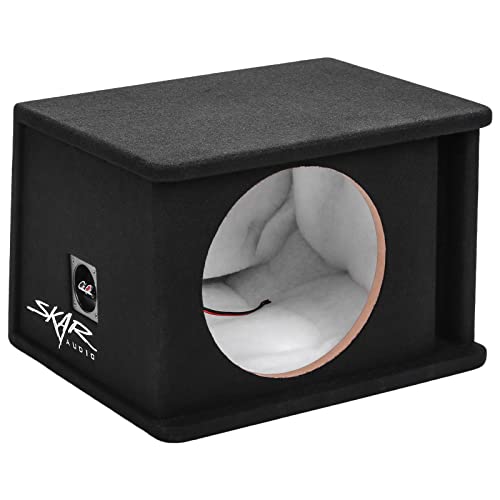
Skar Audio SK1X12V, Single 12-Inch Empty Ported Enclosure in Black Carpet, 1 Box
As an Amazon Associate we earn from qualifying purchases.
The SK1X12V is an empty MDF enclosure with a kerf-style port, black carpet and prewired terminals. Consider it if you already own a compatible 12-inch driver and want a ready-made ported box. The subwoofer and amplifier are separate purchases.
Skar lists a 2.00-cubic-foot box volume and 36Hz tuning, with exterior dimensions of 20.50 inches across, 14.25 inches high and 18 inches at the deeper bottom edge; the top depth is 16 inches. Check those dimensions against both the installation space and the opening through which the box must pass.
Important mounting caveat: The manufacturer’s current specifications and selected marketplace listing give different cutout and mounting-depth figures. Obtain the current drawing and confirmation for your exact driver before ordering. Also establish how the quoted volume treats driver displacement. “Single 12-inch” does not make every 12-inch subwoofer suitable.
Rockford Fosgate P3-1X12: a passive loaded ported enclosure
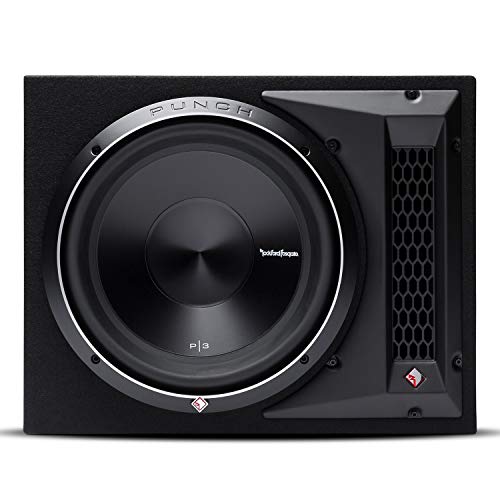
The P3-1X12 includes one 12-inch Punch P3 driver in a vented MDF enclosure. Rockford specifies 600 watts RMS power handling and a 1-ohm final load. This is useful when you want the driver and box matched together while retaining the freedom to choose an external amplifier.
The amplifier decision is essential: confirm that it supports a 1-ohm load in the configuration you intend to use. A bridged two-channel amplifier is not automatically suitable simply because a different operating mode lists a low impedance.
Rockford’s P3-1X12 specifications list dimensions of 15.125 inches high, 19.125 inches wide and 15.75 inches deep. Allow additional room for the port, connections and secure mounting. This listing is for the loaded enclosure; it does not include an amplifier or make a universal vehicle-fit promise.
Rockford Fosgate P300-12: a powered sealed enclosure

The P300-12 combines a 12-inch subwoofer, sealed box and 300-watt RMS amplifier. It is a practical category to consider if you are starting without an amplifier and prefer an integrated system over selecting separate components.
It supports RCA or speaker-level signal integration and includes a remote bass-level control. The wedge measures 15 inches high by 19.8 inches wide, with 11-inch bottom and 7-inch top depths. These measurements describe the standard P300-12, not the differently shaped P300-12T truck version.
Installation limit: Built-in amplification does not eliminate power wiring or factory-radio compatibility checks. Some vehicles require an appropriate interface to obtain a usable signal. Review the official P300-12 specifications and the manufacturer’s powered-enclosure manual before budgeting the complete installation.
Sealed or ported: what changes?
A sealed box has no tuned vent and can be a practical choice when space is limited and the driver is designed for that enclosure volume. A ported enclosure uses a tuned air passage to contribute output around its tuning frequency. Neither label alone guarantees good sound.
Port size, enclosure volume and the selected driver work together. Cutting a hole into a small sealed box is not a reliable way to convert it. Below the tuning region, a ported system can allow excessive driver movement; use the filtering specified for the driver, enclosure and amplifier. KICKER’s ported-enclosure guidance explains these design dependencies.
Avoid choosing solely by music genre. The system’s tuning, listening level, cabin response and available space matter more than a blanket claim that sealed boxes are always “accurate” or ported boxes are always “boomy.”
Four checks for an empty enclosure
- Recommended air space: Find the exact driver’s enclosure recommendation. A box’s outer dimensions are not its usable internal air volume.
- Net versus gross volume: Determine whether the stated figure subtracts the driver, bracing and port displacement. Do not subtract them twice or assume every manufacturer uses the same convention.
- Cutout and mounting depth: Check basket diameter, flange size, magnet clearance, rear ventilation and the space needed for cone movement. Nominal driver diameter is only a starting point.
- Box construction: Check rigid panels, secure terminals and intact joints. An unintended leak in a sealed enclosure is a defect, not an extra port.
KICKER’s box-building guide explains why displacement must be considered. As a simple arithmetic example, a gross internal cavity of 1.25 cubic feet with 0.10 cubic feet occupied by components leaves 1.15 cubic feet before any other deductions. That example is not a recommended box size for the products above.
Plan the whole system before checkout
Write down the subwoofer model, final impedance, amplifier’s continuous output at that impedance, available dimensions and the signal source. Compare RMS ratings with RMS ratings; a peak-power headline should not determine amplifier selection. For a dual-voice-coil driver, the wiring arrangement affects the final load seen by the amplifier.
Include power and signal wiring, appropriate fusing, interfaces, mounting hardware and installation labor in the budget. Secure the enclosure so it cannot become loose cargo. Keep wiring protected from sharp edges, moving seats and heat, and use the equipment manual’s fuse, cable and grounding requirements. Check behind any surface before drilling.
After installation, set crossover and gain controls using the amplifier’s procedure, begin conservatively and investigate distortion rather than adding bass boost. Gain matches signal levels; turning it fully up is not a shortcut to useful amplifier power. Keep listening levels low enough to protect hearing and remain aware of traffic.
Bottom line
Start with the SK1X12V only after confirming an existing driver’s acoustic and physical fit. Consider the P3-1X12 when you want a matched passive package and have a suitable 1-ohm amplifier. Consider the P300-12 when an integrated powered enclosure simplifies your build. In every case, measure first and price the complete installation.
Image note: Relevant existing topic illustration retained; not a representation of exact current card contents.